Know OS Know Mobile Application Testing

My first reaction when I was asked to do a mobile application testing.

Jesus !! So many devices and their versions… flavours?!

I was testing abreast going through blogs, searching for best practices of mobile application testing.. Phew! So here I am sharing my hands on experience on it. 🙂

Large Enterprises are going Mobiles these days. Scores of application run on Mobile and their customers expect to perform fast, robust and most importantly responsive which means to be up at any given time. A Recent Survey revealed Android OS is the leading platform in the Smartphone market worldwide, iOS remained the 2nd platform for mobile while Windows, BlackBerry and Symbian continue to sink.

Android being called the most user friendly platform, it began with the release of the Android beta in November 2007. Android 1.0 was released in September 2008 and it just did not stop updating itself.

Cupcake (1.5)

Donut (1.6)

Eclair (2.0–2.1)

Froyo (2.2–2.2.3)

Gingerbread (2.3–2.3.7)

Honeycomb (3.0–3.2.6)

Ice Cream Sandwich (4.0–4.0.4)

Jelly Bean (4.1–4.3)

and the most recent Android Update was KitKat 4.4.

If rumors are to be believed, Google to issue KitKat 4.4.3 update before Android 4.5(Lollipop).

iOS is the world’s most advanced mobile platform used worldwide developed and distributed by Apple Inc. Originally unveiled in 2007 and Apple Inc. provides updates to the iOS such as iOS 4.x,iOS 5.x,iOS 6.x and the most recent iOS 7, was released on September 18, 2013.

Today Android and iOS are the most famous running mobile platforms with different screen resolutions and sizes. Some very crucial factors to encounter with like Functional, Compatibility, Usability, Performance, Stability and last but not the least Responsive make mobile application testing far more challenging vis-à-vis desktop and web based application testing.

Functional Testing: Sounds simple yet plays a major role which ensures the application is working as per the requirements.

Compatibility Testing: A Mobile Application needs to be deployed and expected to run seamlessly across different mobile devices, OS versions (Versions of OS such as iOS 4.x,iOS 5.x,iOS 6.x, etc.),Screen Sizes, Resolutions etc. as per the need.

Usability Testing: Look and Feel of the User Interface constitutes smooth Navigation between screens, pictures, icons Visibility, texts clarity, presence of Back or Cancel Button making it possible for the users to go back to a previous screen, Proper alert messages pop-ups aiding users understand what exactly happening on the screen.

Performance Testing: Check how does a mobile application behave if connected through wifi, 3G, 2G, out of network, etc. and its performance poor/excellent while a number of temporary files are running; Memory leakage testing is needed for the proper functioning of an application.

Stability Testing: Whether the application crashes while multitasking, on scrolling images on it at a high speed, multi touch on more than one item at the same time.

Responsive Testing: Poor responsiveness is a defect which might give a bad name to a company’s reputation. It might motivate user to uninstall the application and submit a low rating and negative comments in the app store. Check design should fit in any given screen size and resolution, loading time of the images, contents should be timely.

This is just a piece of knowledge been shared with you all. A Tester can never end his quest for finding various ways of testing especially here, it’s a mobile application, and after all we are a part of QA!! 🙂

Happy Testing!!!

When in Testing do as the Testers do!!!

Its high time to bridge a gap between theoretical knowledge and real world implementation.
If you are new to testing domain and just trying googling out the real meaning and approach of testing below are few points which I feel will be handy for a beginner.

– Prepare test cases or a checklist for the project you are assigned in. Include all the test scenarios you can think of. Yes you are thinking right!

P.S. All the positive and negative scenarios. :)

For beginners – Test a simple ‘email log in’ page!
What all scenarios you guys can think of!Yes you are going on right track.. whatever weired comes to your mind..Just do not stop playing around.

P.S. Let the application crash!!! :)

– Start performing tests , find and report bugs but hang on always remember there’s no end to bugs i.e. you can never say ‘This application is bug free’!!

P.S. Cant help it! :(

– Step into Customer’s shoes ; feel like a lay man and you will b amazed to see the number of bugs you come across.

P.S. Do not end up stepping on toes! :(

– Be Creative in your approach ; while writing test cases or preparing a check list. Do not assume.

P.S. Assumptions is the mother of all mistakes! ;)

– Start Suggesting ; Dig into the details and get to know the product’s functionality and general behaviour. This will enable you to add value and suggest new features and enhancements to your product.

P.S. A smart move it is! ;)

Last but not the least..

– Follow Processes ; Stick to the organisation standards and guidelines and process of testing.

P.S. Follow the process and find as many bugs you can..after all we are a part of QA!! :)

Happy Testing!!! :D

Quick Tips for Mobile Application Testing

If you are a beginner while testing a mobile app, few check points to keep in mind going forward.
  •  Check for exact screen sizes, resolutions required to test the application,discuss with developers or client and get the exact   requirement.
  • There are wide variety of mobile devices available in market, know which ones needed. Best way to test is on the real devices.
  • Mobile operating system, know OS and their latest versions supporting features.
  • Check for data loss/recovery by installing/uninstalling application on mobiles.
  • Performance of the application is crucial,check by changing network connection from 2G, 3G to WiFi, check for Battery Usage too.
  • Check how application runs on low memory also check after deleting temporary files.
  • Check Responsiveness of each page.
  • Make Sure application do not crash on any given circumstances.
P.S. You are a USER!

Few Basic Commands and Operations with Selenium 2.0

The biggest change in Selenium recently has been the inclusion of the WebDriver API.

It refers to both the language bindings and the implementations of the individual browser controlling code. This is commonly referred to as just “WebDriver” or sometimes as Selenium 2.

Selenium 1.0 + WebDriver = Selenium 2.0

First of everything, decide if you are going to write your Selenium tests in a high-level language like Java, Ruby, Python, C#, and PHP.

A very simple Selenium test looks like this in Java:

There are too many command operations in webdriver and will look into them one by one. Lets cover a few right now with syntaxes followed by a very simple execution of these syntaxes at the end.

1. Creating New Instance Of Firefox Driver

WebDriver driver = new FirefoxDriver();

2.  Applying Implicit Wait in webdriver

driver.manage().timeouts().implicitlyWait(10, TimeUnit.SECONDS);

3. Maximize Browser Window in webdriver

driver.manage().window().maximize();

4. Navigate to URL or To Open URL in Browser

driver.get(“http://templates.fxserver.com/IBMdemo/?command=b3A9U0hPV19GT1JNJnVuaXRfaWQ9MTAwJmZvcm1fbGFuZz11bmc=”);

5. Get page title in selenium webdriver

driver.getTitle();

6.Typing text in textbox or text area

driver.findElement(By.xpath(“.//*[@id=’100′]/table/tbody/tr[2]/td/table[1]/tbody/tr[1]/td[2]/input”)).sendKeys(“Anisha”);

7. Selecting value from drop down in selenium webdriver.

  • Select By Visible Text

Select mydrpdwn = new Select(driver.findElement(By.name(“state”)));
mydrpdwn.selectByVisibleText(“Alabama”);

It will select value from drop down list using visible text value = “Alabama”.

  • Select By Value

Select listbox = new Select(driver.findElement(By.name(“country”)));
listbox.selectByValue(“AL”);

It will select value by value = “Albania”.

package dpckg;

import java.util.concurrent.TimeUnit;

import org.openqa.selenium.By;
import org.openqa.selenium.WebDriver;
import org.openqa.selenium.firefox.FirefoxDriver;
import org.openqa.selenium.support.ui.Select;

public class Dclass {

 public static void main(String[] args) 
 {
 // TODO Auto-generated method stub
 
 //Creating New Instance Of Firefox Driver
 WebDriver driver = new FirefoxDriver();
 
 //Implicit wait of 10 seconds
 driver.manage().timeouts().implicitlyWait(10, TimeUnit.SECONDS);
 
 //Maximize browser window
 driver.manage().window().maximize(); 
 System.out.println("FireFox opening successful");
 
 //Navigate to URL or To Open URL In Browser
 driver.get("http://templates.fxserver.com/IBMdemo/?command=b3A9U0hPV19GT1JNJnVuaXRfaWQ9MTAwJmZvcm1fbGFuZz11bmc="); 
 System.out.println("The navigation is successful"); 
 
 //Get page title in webdriver
 String title = driver.getTitle();
 System.out.print(title);
 
 //Typing text in textbox or text area
 driver.findElement(By.xpath(".//*[@id='100']/table/tbody/tr[2]/td/table[1]/tbody/tr[1]/td[2]/input")).sendKeys("Anisha");
 System.out.println("\nThe first name is populated");
 
 //Selecting value from drop down in webdriver.
 
 //Select by visible text
 Select mydrpdwn = new Select(driver.findElement(By.name("state")));
 mydrpdwn.selectByVisibleText("Alabama");
 
 //Select by value
 Select listbox = new Select(driver.findElement(By.name("country")));
 listbox.selectByValue("AL");

In this way, in my first webdriver script, a very few basic commands to perform actions on web element of your web page have been covered. Remember this is just the beginning, lot more to come .. 🙂

Download and Install Selenium Webdriver with Eclipse and Java Step By Step

Step 1 : Download and install Java in your system

First of all you need to install JDK (Java development kit) in your system. To download java Click here and install it in your system.

java.png  1346×553

Step 2 : Download and install Eclipse

Download Eclipse and save it in any drive. It’s free.

java1.png  1346×553

Step 3 : Download WebDriver Jar Files.

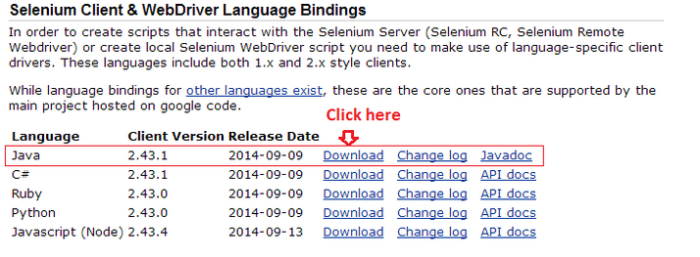
Selenium WebDriver supports many languages and each language has its own client driver. Here we are configuring selenium 2.0 with Java so we need ‘Webdriver Java client driver’. Click here for WebDriver download file. On that page click on ‘Download’ link of java client driver as shown.

java2.png  1346×553

Extract and save it in your system in any Drive. There will be ‘libs’ folder, 2 jar files and change log in unzipped folder. We will use all these files for configuring WebDriver in eclipse as shown.

java3.png  1346×553

Step 4 : Start Eclipse and configure it with selenium 2 (WebDriver)

  • Select WorkSpace on eclipse start up

Double click on ‘eclipse.exe’ to start eclipse. Create new folder in a drive with name ‘workspace’ and select it as your Workspace  where your work will be stored and click Ok as shown.

wc.png  1346×553

Now Eclipse will open

  • Create new Project 

Create new java project from File > New > Project > Double click Java Project and give your project name ‘testproject’ as shown.

jav.png  1346×553

Click on ‘Finish’ Button.

Untitled

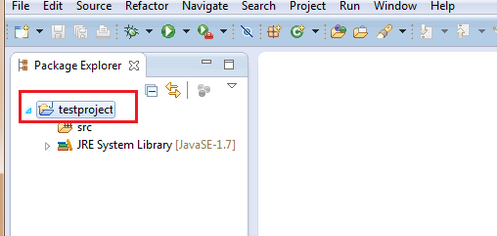
Created project ‘testproject’ will be shown on eclipse

3.png  1346×553

  •  Create new Package

Right click on ‘testproject’ and select New > Package.

4.png  1346×553

Give your package name ‘testpackage’ and click ‘Finish’ as shown.

5.png  1346×553

  • Create new Class

Right click on ‘testpackage’ and select New > Class.

6.png  1346×553

Give your class name ‘TestClass’ and click ‘Finish’ as shown.

7.png  1346×553

Your Eclipse window will look like as shown.

81.png  1346×553

  • Add External jar files to Java build path

 – Right click on project ‘testproject’ > Select Properties > Select Java build path > Navigate to Libraries tab.
Click on Add external JARs button > select both .jar files from the folder in the drive.
Click on add external JARs button > select all .jar files from the folder in the drive.

Your ‘testproject’ properties dialog will be shown as below

91.png  1346×553

Next be ready to write your first WebDriver Script with Eclipse. Let’s get started !!

Why Selenium ?

Selenium is primarily a testing tool that automates browsers and web applications. It is an open source technology that provides a portable software testing framework to software testers. Ii has come a long way and one of the leading free testing tools available in the industry. Due to its Open Source nature, its highly in demand ! Selenium is available for all major platforms (Windows, Macintosh, and Linux) and works on major browsers.

Selenium IDE

Selenium IDE is a Firefox add-on that is used for recording, creating, and enhancing scripts. It is used to record your interactions with the browser and play them back. IDE stands for integrated development environment.

Selenium IDE records scripts in a special scripting language called Selenese. This language makes it easier for the tester to provide commands to the browser, such as automating the browser to select an option or to click a link. There are also commands for retrieving data from pages. Scripts in Selenese may also be recorded automatically.

Selenium IDE is that Selenese is easy to understand and anyone with a basic knowledge of web application testing can learn Selenium IDE in a few days.

Selenium WebDriver

The Selenium WebDriver drives a browser natively as a user would. It supports Chrome, Firefox, Internet Explorer, iPhone, Android, and all major browsing platforms effectively.

The Selenium WebDriver has rendered the Selenium Remote Control obsolete, and is commonly referred to as Selenium 2.0. Selenium 2.0 does not require a special server and can start and control a browser directly. Selenium 2.0 is supported by C#, Ruby, Python, and Java.

Selenium 2.0 will be popular among testers who want to scale and distribute scripts across multiple environments.

Advantages of Learning Selenium

  • If you are looking to enhance your career options in the testing industry.
  • If you are a web application tester and are still using manual testing, Selenium will change your career dramatically.
  • By learning how to automate testing through Selenium, you will be able to accomplish more in less time, and will be able to offer your services to more clients.
  • Selenium 2.0 supports all major browsers, all major operating systems, all major programming languages, and easily runs multiple tests simultaneously.

Simple Java

Before we get started with Selenium WebDriver, lets know the basics of any supporting language like Java. Do not jump on to Selenium WebDriver directly, know Selenium IDE first, it helps you learn the former quickly and easily.

Consider a Java program it can be defined as a collection of objects that communicate via invoking each other’s methods.

  • Object – An object is an instance of a class.
  • Class – A class can be defined as a template that object of its type support.
  • Methods –  A class can contain many methods. It is in methods where the logics are written, data is manipulated and all the actions are executed.
  • Instance Variables – Each object has its unique set of instance variables. An object’s state is created by the values assigned to these instance variables.

#Enter your Java Code into Eclipse

Lets take a simple code that would print Simple java on your Eclipse assuming that you already have Eclipse installed on your computer.

simple java program1.png  1346×553

#Watch out for the errors in your code

Any errors will be underlined in red, and an icon with an “X” will show up on the left. Fix your errors.  By mousing over an error icon, you can see a suggestion box that lists the ways you can fix the error.

error.png  1346×553

#Compile your Program

Now that your program is free from errors, click the triangular icon to run your program.  Another way to run your program is to select “Run” from the main menu and then select “Run” again from the drop-down menu.  The shortcut is Ctrl+F11.

output.png  1346×553

It is very important to keep in mind the following points

  • Case Sensitivity – Java is case sensitive, which means identifier Simple and simple would have different meaning in Java.
  • Class Names – For all class names the first letter should be in Upper Case.If several words are used to form a name of the class, each inner word’s first letter should be in Upper Case.

    Example class MyFirstJavaProgram

  • Method Names – All method names should start with a Lower Case letter.If several words are used to form the name of the method, then each inner word’s first letter should be in Upper Case.

    Example public void myMethodName()

  • Program File Name – Name of the program file should exactly match the class name.When saving the file, you should save it using the class name (Remember Java is case sensitive) and append ‘.java’ to the end of the name (if the file name and the class name do not match your program will not compile).

    Example : Assume ‘MyFirstJavaProgram’ is the class name. Then the file should be saved as‘MyFirstJavaProgram.java’

  • public static void main(String args[]) – Java program processing starts from the main() method which is a mandatory part of every Java program.

Above is a very simple program. So let’s get started !